Coordinate Transfomations in 3D Graphics

In Graphics Programming, we refer to Geometry Processing as the set of all the necessary operations needed to transform 3D vertices into 2D coordinates on the screen. This part of the graphics pipeline in particular is full of 3D math and complex coordinate transformations, and therefore it’s easy to lose your train of thoughts somewhere down the road. In this post i want to share my understanding of the subject, and my personal implementation in OpenGL.


Transformations

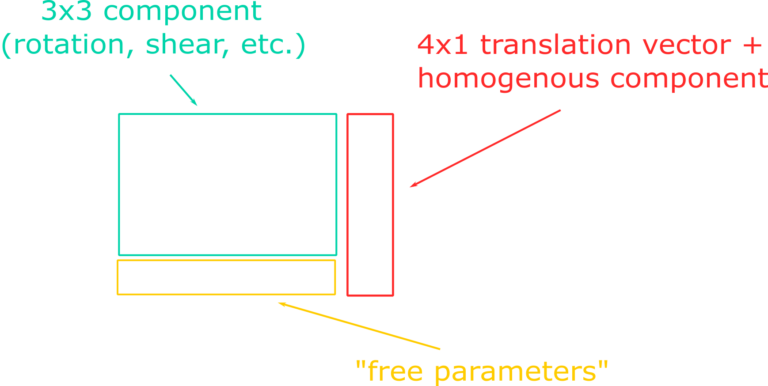
First of all, let’s deal with the elephant in the room. What is a transformation? You can think about it in a math fashion, or in a computer science fashion. Starting with the first interpretation, a transformation is a matrix that, when applied to an input vector, warps it from its input space to an output space. The net effects of a transformation can be one or more between the following: translation, rotation, scaling, reflection, shearing, stretching and squeezing. While a translation can be expressed with a simple 3D vector, all the other fancy effects can be described with a 3×3 matrix. If we bundle up these two components in the same matrix we get an affine transformation, which is characterized by its ability of preserving collinearity (hence transforming parallel lines into other parallel lines). An affine transformation can be represented by a 4×4 matrix containing a 3×3 component in the upper left corner and a translation component in the fourth column. If we pack the information in this way, we need to use 4D input vectors in order for our transformations to apply the translation effect as well.  Working with 4D vectors moves us away from the Euclidean space into the domain of homogenous coordinates. The final step to complete our transformation matrix is to add a 3D vector in the fourth row, usually set equal to Vec3(0, 0, 0). These three numbers are effectively “free parameters” because we can design them in order to suit our needs. We will see one neat trick that’s possibile to achieve thanks to them in a little bit, when we’ll talk about the perspective projection.


Homogenous coordinates have very interesting properties. With them it’s possible to express the location of a point in 3D space by dividing the x, y and z components of the 4D homogenous vector by w. This operation hints that the 3D Euclidean space is actually a subset of the 4D homogenous space obtained by setting w = 1. Under this condition, a line in 4D is projected to a point in 3D and this is also why these coordinates are called “homogenous”: scaling a 4D vector by any amount (greater than zero) still produces the same projected point in 3D space, after dividing by the w-component. A necessary consequence of these properties is that, when the homogenous coordinate is equal to one, the geometrical interpretation of the 4D vector is equal to a point in Euclidean space. When w = 0, however, it’s not possible to find anymore an intersection between the 4D line and any point in 3D space. We talk about “point at infinity” or “direction”, to differentiate with respect to the previous case. So, points have a w = 1 and directions have a w = 0, and the usual math rules apply exactly like in the case of two 4D vectors. Directions can be summed, producing another direction (head-to-tail method), or a point and a direction can be summed in order to produce a translated point. The difference between two points, instead, produces a direction since the w-components subtract to zero. Finally, the sum of two points produces another point with coordinates equal to the averaged components (remember that we need to divide by w!). A very good discussion about points and directions can be consulted in this presentation https://www.youtube.com/watch?v=o1n02xKP138. As a final note about the mathematical interpretation of transformations, it’s important to keep in mind that matrix multiplication is not commutative, and that the correct composition of multiple consecutive transforms is obtained by applying them in a right-to-left fashion.

According to the computer science interpretation instead, a transformation is just a data structure, usually a 4×4 multidimensional array of floating point values. The data storage in the multidimensional array can be executed by placing row values as contiguous in memory (row-major order) or column values instead (column-major order). I personally prefer the latter, since column vectors are generally more useful in computer graphics, and the acces to a column vector in a column-major ordered matrix is fast and simple in C++. However, their disadvantage is that in the visual studio debugger all matrices appear as transposed! This can be solved by building custom debug services, such as visualization tools and introspections, or by applying a further transposition to counteract the previous one.


The Model-View-Projection (MVP) Matrix

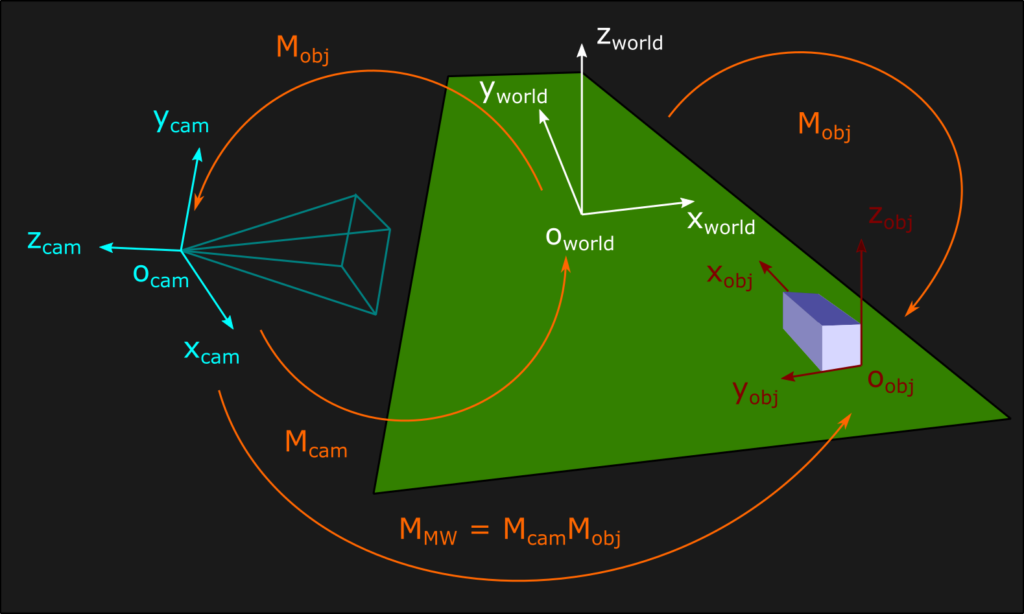
Now let’s talk about why transformations are important in computer graphics. All the graphic assets of a videogame, from images to 3D models, exist inside their own coordinate system called object space. Inside the virtual environment simulated by a videogame, instead, the vertices of all 3D models exist into a coordinate system that is often called world space (or global space). The world space acts as a big container, is unique and expresses the position and the orientation of every object with respect to its origin. The transformation that moves each vertex from its object space to the global world space is called object transform (or model transform), in short Mobj. The game logic usually dictates how to move each object, and therefore our application is responsible for defining all the object transforms. However, there is one object transform in particular that needs some special attention: the camera. Just like all other objects, the camera has its position and orientation expressed in world space, but sooner or later every graphics simulation needs to see the rest of the world through its eyes. For this to happen, it’s necessary to apply to each object in world space the inverse of the object transform relative to the camera. After this transformation vertices exist inside the camera space, a right-handed coordinate system centered on the world origin that may have the positive y direction going upward, and the positive z going in the opposite direction of the camera gazing (this is the convention used in my engine). Alternatively, the y can be top-down and the positive z can be directed as the camera gazing, if we want to keep the coordinate system as right-handed. Since the camera is special, and also because it’s easy to be confused by all this nomenclature and mathematical reasoning, we usually define a camera transform (or view transform) Mcam to differentiate it from all other object transforms. In the graphics programming literature, however, the camera transform is defined according to at least two different conventions. Technically, the transform that moves the camera from the origin of the world to its desired position is an object transform, but often this is the one defined as camera transform. In this case, by applying the inverse of the camera transform we are able to work inside the camera space. Other sources instead consider the forward transform as an object transform, and define the inverse transform as the actual camera transform. This last interpretation is my personal favourite and this is the convention i follow in my engine. Now, having formalized our approach, let’s discuss some practical implementation. Computing the inverse of a matrix is usually an expensive operation, but sometimes math comes in our aid! In the case of orthogonal matrices like rotations, the inverse is equal to the transpose (i’ll save you the proof, you can find it literally everywhere all over the internet). For homogenous transformations, the inverse computation takes the following form (also easy to demonstrate):


When i deal with a matrix transformation i usually like to store both forward and inverse transforms inside a struct. This allows to pre-compute both of them, saving me an unnecessary runtime burden. For example, the camera transform can be computed as follows:

// Transform4f is derived from a more generic Matrix4f, a column-major multidimensional array
// in which we keep the fourth row equal to [0, 0, 0, 1]. All the needed math functions and
// operator overloadings are omitted for the sake of brevity. Let's see only how to compute
// the inverse of an orthogonal transform

Transform4f Transform4f::InvOrtho(const Transform4f& T)
{
Transform4f result = Transform4f::Transpose(T);
result.setTranslation(-(result * T.getTranslation()));

return result
}

struct transform4f_bijection

{
Transform4f forward;
Transform4f inverse;
};

// Define the object tansform for the camera. In this case the constructor takes a
// 3x1 translation vector and a 3x3 rotation matrix representing camera position
// and orientation

Transform4f camObjectTransform(rotationMatrix, translationVector);

// We define the camera transform as the inverse object transform for the camera
transform4f_bijection cameraTransform;
cameraTransform.forward = Transform4f::InvOrtho(camObjectTransform);
cameraTransform.inverse = camObjectTransform;

As a final note on camera transforms, consider that it’s possible to compose them with the object transforms in order to create the model-view transform, which allows to move objects directly inside the camera space without passing through the world space. In order to have an intuitive graphical understanding of the whole situation, we can use by convention an arrow that points from the source space to the destination space, indicating the flow of all the various transforms:


After applying the model-view transform we are in camera space and we are ready for the next step: the projective transform, which brings us inside the clip space. As you may know by simply playing any videogame ever, during the simulation we are only able to see what the camera allows us to see. Every geometry that is not visible by the camera needs to be clipped because it would be a waste of resources to be rendered otherwise. The projection allows us to determine which vertex has to be rendered, and it achieves this goal by mapping the view volume into the clip space. The view volume is simply a collection of clip planes: top (t), bottom (b), left (l), right (r), near (n) and far (f). As far as the clip space is concerned, instead, it usually has the x and y directions mapped in the [-1, 1] range, and it may have the z direction mapped just like the other ones (OpenGL) or inside the [0, 1] range (Direct3D, Vulkan, Metal, consoles). While the mapped ranges are the same for different types of projection, the view volumes changes substantially instead. For orthographic projections the view volume is a cube, while for perspective projections it has the shape of a frustum:


The projection plane represents the 2D screen. In the previous figure it is depicted inside the view volume but this is not a requirement. The near clip plane, in fact, is often placed in front of the projection plane for two main reasons. Firstly, because in this way all the objects that would be too close to the camera are going to be clipped instead, allowing to clear the visual from unwanted details. Secondly, by moving the near clip plane ahead the depth buffer precision is going to improve. The distance between camera and projection plane is often called focal length (g) because of its graphical similarity with the homonym quantity in the field of Optics, even if there is no actual relation between these two variables.
Whichever the choice between orthographic and perspective, the projection matrix will in turn be composed with the model-view matrix, creating the Model-View-Projection (MVP) matrix. However, it’s still necessary to have a solid understanding about the different types of projection. Let’s explore this topic in the next few sections.

Orthographic projection

After the orthographic transform all parallel lines in world space are going to be projected as parallel lines in the projection plane (xp=xcam, yp=ycam), so an affine transform will be just fine. The orthographic matrix needs to map the x and y dimensions of the projection plane in the range [-1, 1]. In order to achieve that, let’s apply the matrix multiplication rule to the first element of the 4D input vector. If we use two variables A and B as parameters of the transformation, we can determine their values by applying the left and right planes constraints. The same reasoning can be applied also to the y-component for symmetry:

 x_{clip} = A*x_{cam} + B 

\begin{cases} 1 & = & A*r + B \\ -1 & = & A*l + B \end{cases} \hspace{45pt} \Rightarrow \hspace{18pt} \begin{cases} A & = & (1 - B) / r \\ -1 & = & (1 - B) * l/r  + B \end{cases}

\begin{cases} A & = & (1 - B) / r \\ -r & = & l - B*l + B*r \end{cases} \hspace{17pt} \Rightarrow \hspace{18pt} \begin{cases} A & = & 2 / (r - l) \\ B & = & - (r + l) / (r - l) \end{cases}

y_{clip} = A*y_{cam} + B

\begin{cases} A & = & 2 / (t - b) \\ B & = & - (t + b) / (t - b) \end{cases}

For the depth range instead we are going to consider a mapping inside the [0, 1] interval, even if we are working in OpenGL. This is more in line with all the other graphics API and it improves the depth buffer precision as well. We can define two variables A and B in position (3, 3) and (3, 4) of the orthographic matrix in order to specify the mapping for near and far planes. Applying the same reasoning as before, we can write the following expressions:

 z_{clip} = A*z_{cam} + B 

\begin{cases} 0 & = & -A*n + B \\ 1 & = & -A*f + B \end{cases} \hspace{35pt} \Rightarrow \hspace{23pt} \begin{cases} A & = & B/n \\ 1 & = & -B * f/n  + B \end{cases}

\begin{cases} A & = & B/n \\ n & = & -B*f + B*n \end{cases} \hspace{17pt} \Rightarrow \hspace{23pt} \begin{cases} A & = & 1 / (n - f) \\ B & = & n / (n - f) \end{cases}

Finally, let’s see an implementation in C++ that also pre-computes and stores the inverse transformations. Note how when the viewing volume is symmetrical along the x and y directions, both the non-diagonal contributions are nullified (r+l and t+b compensate themselves). Only the asymmetrical depth range generates a non-diagonal element:

// We use a more generic Matrix4f struct, instead of the previous Transform4f, in order
// to create a common ground with the perspective projection (see the next section). The
// perspective, infact, needs to use also the free parameters of the transform
matrix4f_bijection orthographicTransform(float width, float height, float n, float f)
{
matrix4f_bijection result;

float w = 2.0f / width;
float h = 2.0f / height;
float A = 1.0f / (n - f);
float B = n / (n - f);

result.forward = Matrix4f( w , 0.0f, 0.0f, 0.0f,
0.0f, h , 0.0f, 0.0f,
0.0f, 0.0f, A , B ,
0.0f, 0.0f, 0.0f, 1.0f);

result.inverse = Matrix4f(1.0f/w, 0.0f, 0.0f, 0.0f,
0.0f, 1.0f/h, 0.0f, 0.0f,
0.0f, 0.0f, 1.0f/A, -B/A,
0.0f, 0.0f, 0.0f, 1.0f );

// Place a breakpoint here and check the correct mapping
#if _DEBUG_MODE
Vector4f test0 = result.forward * Vector4f(0.0f, 0.0f, -n, 0.0f);
Vector4f test1 = result.forward * Vector4f(0.0f, 0.0f, -f, 0.0f);
#endif

return result;
}


Perspective projection

The perspective transform is a different beast compared to the orthographic one. In this projection, the x and y-components are scaled with the inverse of the z-component, in order to represent our visual perception of distant objects being smaller than close ones. This is inherently a non-linear operation and therefore the affine transforms are no longer sufficient to describe our problem. Mathematically, we can justify this truth by observing that affine transformations cannot possibly apply a division for one of their input values, which is what we would need to do with the z-component. Intuitively, instead, we can just consider that affine transformations are invariant with respect to parallel lines, but the perspective is not! Think about train tracks disappearing into the horizon: they are clearly parallel, or at least we hope so for the trains and all the passengers, but visually they seem to converge up to some point at infinity. This problem can be solved by homogenous coordinates and the “free parameters” of the projection matrix we mentioned before. Homogenous coordinates perfectly suit our needs because they actually apply a division by one of their input values, the w-component. Considering that all modern graphics API perform automatically the perspective divide as a GPU operation, we just need to use one of our free parameters in order to place -z (remember our coordinate system convention) into the w-component. This can be achieved by setting the (4, 3) component of the perspective transform to -1, and then the matrix multiplication rule is going to apply its magic.

Another consequence of the perspective transform is that the postion of the projection plane, or in other words the focal length, is now very relevant to the visual outcome because of the inverse depth scaling. In fact, by moving the projection plane closer to the scene it’s possible to see a zoom effect. In order to understand the mathematical relation between depth, focal length and projection planes is sufficient to apply the similar triangles formula. In this model, the common vertex is the camera while the bases are projection plane and an arbitrary depth value into the game world:


The same reasoning can be applied also for the x-component, which is the one orthogonal to the screen in the previous figure. This information, together with our desired clip values, allows us to design the perspective transform using a similar approach to the one we used in the orthographic case. We determine the value of A and B after applying the matrix multiplication, only that this time B is in a different position ([1, 3] for x and [2, 3] for y in a column-major case) and we also need to consider the perspective divide:

 x_{clip} = A*x_{p} + B*z_{p} 

\begin{cases} 1 & = & A*r + B*z_{p} \\ -1 & = & A*l + B*z_{p} \end{cases} \hspace{25pt} \Rightarrow \hspace{25pt} \begin{cases} B & = & (1 - A*r) / z_{p} \\ -1 & = & A*l + 1 - A*r \end{cases}

\begin{cases} B & = & (1 - A*r) / z_{p} \\ A & = & 2 / (r - l) \end{cases} \hspace{29pt} \Rightarrow \hspace{26pt} \begin{cases} B & = & -(r + l) / (z_{p}*(r - l)) \\ A & = & 2 / (r - l) \end{cases}

Substitute the perspective equations inside the transform:

\begin {cases} x_{p} & = & g * x_{cam}/z_{cam} \\ z_{p} & = & z_{cam} \end{cases} \hspace{13pt} \Rightarrow \hspace{8pt} x_{clip} = \frac{2*g*x_{cam}}{-z_{cam} * (r - l)} + \frac{z_{cam} * (r + l)}{-z_{cam} * (r - l)}

Since the perspective divide will happen after the transform,
the desired A and B values are the following:

\begin{cases} A & = & 2*g / (r - l) \\ B & = & (r + l) / (r - l) \end{cases}

The same computations are valid for the y-component if we use the
top and bottom clip planes:

y_{clip} = A*y_{p} + B*z_{p}

\begin{cases} A & = & 2*g / (t - b) \\ B & = & (t + b) / (t - b) \end{cases}

For the z-component we have to work with two parameters in position (3, 3) and (3, 4) of the perspective matrix. As usual we map the depth component into the [0, 1] range, but this time we need to consider the perspective divide from the beginning:

 z_{clip} = \frac{A*z_{cam} + B*w_{cam}}{-z_{cam}} =  \frac{A*z_{cam} + B}{-z_{cam}} 

\begin{cases} 0 & = & (-A*n + B) / n \\ 1 & = & (-A*f + B) / f \end{cases} \hspace{25pt} \Rightarrow \hspace{25pt} \begin{cases} B & = & A*n \\ f & = & -A*f + A*n \end{cases}

\begin{cases} B & = & A*n \\ A & = & f / (n - f) \end{cases} \hspace{49pt} \Rightarrow \hspace{25pt} \begin{cases} B & = & n*f / (n - f) \\ A & = & f / (n - f) \end{cases}

Before seeing a C++ implementation of the perspective matrix, it’s interesting to make some consideration about the focal length value. While of course it’s possible to choose an arbitrary value that makes sense for any specific application, the focal length also influences the Field of View (FOV) or, in other words, the angles between left-right (FOVx) and top-bottom (FOVy) clip planes. A common approach is to choose preemptively the FOVs, and them determining the necessary focal length that reproduces them. For example, if we choose a projection plane that extends from -1 to 1 along the y-direction, and from -s to +s where a is the screen aspect ratio, the focal length can be computed using simple trigonometrical relations:

Under these conditions, the A parameters for x and y components become respectively equal to g/s and g. With all these informations we are now able to write our C++ implementation:

matrix4f_bijection perspectiveTransform(float aspectRatio, float focalLength, float n, float f)
{
matrix4f_bijection result;

float s = aspectRatio;
float g = focalLength;
float A = f / (n - f);
float B = n*f / (n - f);

result.forward = Matrix4f(g/s , 0.0f, 0.0f, 0.0f,
0.0f, g , 0.0f, 0.0f,
0.0f, 0.0f, A , B ,
0.0f, 0.0f, -1.0f, 0.0f);

result.inverse = Matrix4f(s/g , 0.0f, 0.0f, 0.0f,
0.0f, 1.0f/g, 0.0f, 0.0f,
0.0f, 0.0f, 0.0f, -1.0f,
0.0f, 0.0f, 1.0f/B, A/B );

// Place a breakpoint here and check the correct mapping
#if _DEBUG_MODE
Vector4f test0 = result.forward * Vector4f(0.0f, 0.0f, -n, 0.0f);
test0.xyz /= test0.w;

Vector4f test1 = result.forward * Vector4f(0.0f, 0.0f, -f, 0.0f);
test1.xyz /= test1.w;

#endif

return result;
}

After the perspective divide the clip space is now in the Normalized Device Coordinates (NDC) space, and we are ready to build our MVP matrix with the usual matrix composition rule:

 M_{MVP} = M_{proj}*M_{cam}*M_{obj} 

The final matrix needed to complete the pipeline is the viewport transform, and it’s used in order to map the clip space coordinates (or NDCs in perspective projections) to the desired screen rectangle in pixel coordinates, or screen space. This transformation is actually very simple and most of the time it can be implemented using the graphics API of choice. In OpenGL, for example, it’s represented by the function glViewport(GLint x, GLint y, GLint width, GLint height) and it’s necessary to include as arguments the parameters of the screen rectangle. As a final note, remember that the code we discussed up to this point is still a CPU code, and from the projection matrix onwards we want to work with the GPU instead. The MVP matrix needs to be passed from the CPU memory to the GPU one, for example using uniforms in OpenGL, and then it’s possible to manipulate it in a vertex shader.

Understanding these transformations is just the first necessary step before starting to deal with more advanced concepts in graphics programming. As i already said at the beginning of the post, this is not an inherently difficult topic but it can be disorienting if you haven’t had enough confidence with it. My advice is to keep reading, possibly also from several different sources, and keep implementing your own perspective matrix over and over again. Try to change the depth range mapping to [-1, 1], and/or maybe the coordinate system convention, or if you feel brave enough you can go deeper down the reverse z-buffer road: https://www.danielecarbone.com/reverse-depth-buffer-in-opengl/

That’s all for now, and thanks for your patience if you managed to read this far! 

Multithreading and job queues

Multithreading is one essential element in modern game programming, but it’s also the nightmare of many developers and the cause of countless bugs. The way i think about it is like the combination of one unsolvable problem and two solvable problems. The first one is a direct consequence of the nature of concurrency: without multithreading our code is deterministic, while after introducing concurrency the determinism is lost. We can design very sophisticated thread managers, but in the end it’s always the operating system that makes the call about the execution ordering, and we have no control over that. The main consequence of this problem is that it becomes very difficult to reason about your code. The second problem is represented by our necessity to decide which thread executes what task. This is of course solvable, but as many other solvable problems there are more efficient solutions than others. And finally, we have the issue of communicating between threads, particularly in order to handle synchronization and shared data. In this post i want to discuss one neat way in particular of implementing multithreading, one that hopefully solves the last two problems in an efficient way: the job queue (also known as work queue, or task system, or scheduler, or whatever, you get the point!). 


A Fresh Perspective on Concurrency

Let’s start from the basic way you might want to deal with concurrency in a first place. You have a bunch of threads and a bunch of semi-independent systems in your engine that you want to parallelize. The most straightforward way to deal with the first solvable problem i mentioned before is to assign one thread to each system, and therefore you can create your AI thread, the audio thread, the debug system thread, the asset loading thread, etc.. However, if you care about performance and optimization you will discover that this system is actually very inefficient. Maybe your AI thread is always going to be full of work, but what about the audio thread, or the asset loading one? Probably your application is not going to import assets all the time, or to play hundreds of audio files together, and as a consequence you might have some thread that is starving for some additional work. Another way of thinking about who executes what, is to schedule the threads not according to the different conceptual systems that compose your engine, but according to the concept of priority. All the needed tasks can be sent into a queue with the desired priority level, without making differences about their own nature. The queue itself can be FIFO, meaning that tasks with the same priority start to be processed in order of arrival (but can finish in a complete different order of course), and circular to have wrapping for read and write indices. This system ensures that each thread has always some work to do, provided that the subdivision of priorities is actually balanced. However, we need to solve a new problem now! How can we be sure that the same task is not executed by multiple threads? This was not a possibility before, since the threads were organized by categories and the same task could only be executed by a single thread. The answer comes from special x64 instructions such as InterlockedCompareExchange, designed in order to guarantee the univocity of the execution with respect to multiple competing threads. The way this function works is by atomically comparing a destination value and a comparand value, both representing the index of the next entry to read, and if they are equal the destination is replaced with a third value (usually the incremented index). The function returns the original destination value, and since the first thread that wants to execute the task is going to increment the index, it’s possible to guarantee thread safety by executing the task only if the return value is equal to the original index. The function adds a little bit of overhead to the system, but we can minimize its impact by designing our tasks to be long enough to limit the amount of function calls.

Up to this point the idea of a job queue seems convincing, but let’s stress the system a little bit more. Tasks can be added during the lifetime of our application and the queue can execute them using a busy-waiting technique. In this way, after a thread finishes some work it can be put to sleep for the desired amount of time. This is very important because we want our program to execute also the rest of the code, without being stuck forever into the queue,  but it is also useful in order to limit the power consumption of our application. However, the communication problem we mentioned before is very relevant right now. How can we signal to the operating system when to put a thread to sleep or to resume its activity? A common solution to this issue is to use a semaphore, which is a countable wait primitive capable of controlling a shared resource between threads. A semaphore handles a count between a minimum and a maximum value (in this case equal to the amount of threads). Initially the count is set to zero and this can be interpreted as zero available threads. When the count is incremented, a number of threads proportional to the count itself are awaken from their sleep and are capable of executing the tasks. Each time the game logic sends the necessary data for a task it has to increment the semaphore by one, asking for the attention of at least one thread. In Win32 this increment can be performed by calling the ReleaseSemaphore function. Finally, after a thread wakes up it decrements the count by one, effectively signaling to be unavailable for the time being. 


Implementing the job queue

Now it’s time to turn all this fancy reasoning into practice. Using C++ and the Win32 API to begin with, we can spawn a new thread by calling the CreateThread function. As with any Win32 function it’s useful to read the related documentation, which you can find here (https://docs.microsoft.com/en-us/windows/win32/api/processthreadsapi/nf-processthreadsapi-createthread). After reading the explanation of the function arguments we discover that it’s necessary to include an application-defined function, called ThreadProc, which represents the entry point of the thread. Moreover, we can pass a pointer to a variable or a struct that we want to be used by the thread, and in our case this struct is going to be our work queue itself. Let’s start by defining the queue as a collection of entries, a semaphore and a bunch of volatile variables that are going to be useful in order to control the queue itself. The entries in turn contain a data component and a callback that represents the actual task:

// We pre-declare the platform_work_queue to break the circular dependency
// The callback is defined through a macro because in this way we only need to 
// specify its name, instead of writing every time also the prototype
struct platform_work_queue;
#define PLATFORM_WORK_QUEUE_CALLBACK(name) void name(platform_work_queue* queue, void* data)
typedef PLATFORM_WORK_QUEUE_CALLBACK(platform_work_queue_callback);

struct platform_work_queue_entry
{
	void* data;
	platform_work_queue_callback* callback;
};

struct platform_work_queue
{
	platform_work_queue_entry entries[256];

	HANDLE semaphoreHandle;
	
	uint32 volatile completionGoal;
	uint32 volatile completionCount;
	uint32 volatile nextEntryToRead;
	uint32 volatile nextEntryToWrite;
};

The volatile keyword is a way to warn the compiler that a variable might be changed externally (by another thread in this case), and therefore it’s not allowed to optimize it away. This is another very important concept in multithreading programming, which is also linked to the problem of synchronization and communication: the compiler doesn’t know about the existence of other threads, and therefore it might choose to hide away some variable into a register if the current thread is not going to use it. Specifying variables as volatile is not only useful, but also necessary in these cases. Before the creation of the threads we initialize all volatile variables to zero and we create and assign a semaphore to the queue:

// Right now we only need to pass the queue into the thread, but if some additional
// non queue-related data is needed this is the struct we have to fill
struct win32_thread_startup
{
	platform_work_queue* queue;
};

void createWorkQueue(platform_work_queue* queue, uint32 threadCount, win32_thread_startup* threadStartups)
{
	queue->completionCount = 0;
	queue->completionGoal = 0;
	queue->nextEntryToRead = 0;
	queue->nextEntryToWrite = 0;

	uint32 initialCount = 0;
	queue->semaphoreHandle = CreateSemaphoreEx(0, initialCount, threadCount, 0, 0, SEMAPHORE_ALL_ACCESS);

	for (uint32 threadIndex = 0; threadIndex < threadCount; ++threadIndex)
	{
		win32_thread_startup* threadStartup = threadStartups + threadIndex;
		threadStartup->queue = queue;

		DWORD threadID;
		HANDLE threadHandle = CreateThread(0, 0, ThreadProc, threadStartup, 0, &threadID);
		CloseHandle(threadHandle);
	}
}

// The concept of priorities can be implemented by spawning an array of threads associated
// to a single queue. Different queues may handle a different number of threads, and the
// latter is what ultimately determines their priority level. Here is an example about
// the creation of two queues, one high priority and one low priority

// High priority queue
win32_thread_startup HPThreadStartups[6] = {};
platform_work_queue HPQueue = {};
createWorkQueue(&HPQueue, ArrayCount(HPThreadStartups), HPThreadStartups);

// Low priority queue
win32_thread_startup LPThreadStartups[2] = {};
platform_work_queue LPQueue = {};
createWorkQueue(&LPQueue, ArrayCount(LPThreadStartups), LPThreadStartups);

Now let’s see how to define the ThreadProc function. At first we extract the queue that is passed through the win32_thread_startup struct, and then we execute the busy-waiting loop:

DWORD WINAPI ThreadProc(LPVOID lpParameter)
{
    win32_thread_startup* threadStartup = (win32_thread_startup*)lpParameter;
    platform_work_queue* queue = threadStartup->queue;
        
    for (;;)
    {
    	if (processNextWorkQueueEntry(queue))
    		// decrease semaphore count by 1 (on wakeup, not on entry)
    		WaitForSingleObjectEx(queue->semaphoreHandle, INFINITE, FALSE);		
    }
}

The function processNextWorkQueueEntry implements the actual FIFO logic for the queue. At the beginning we save the index of the next entry to read into a comparand variable. If this index is equal to the one determined by the corresponding addWorkQueueEntry call, then the thread has work to do, otherwise it is going to sleep. If we are working, now it’s the time to execute the InterlockedCompareExchange trick by letting the first available thread to increment the entry index (note the queue circularity through the modulus operator). Finally, only this lucky first worker has the privilege to execute the callback and to atomically increment the completion count:

bool32 processNextWorkQueueEntry(platform_work_queue* queue)
{
	bool32 shouldSleep = false;

	// Implement circular FIFO queue
	uint32 originalNextEntryToRead = queue->nextEntryToRead;
	uint32 newNextEntryToRead = ((queue->nextEntryToRead + 1) % ArrayCount(queue->entries));

	// If there is work to do
	if (originalNextEntryToRead != queue->nextEntryToWrite)
	{
		// Increment index
		uint32 index = InterlockedCompareExchange((LONG volatile*)&queue->nextEntryToRead, newNextEntryToRead,
			                                  originalNextEntryToRead);

		if (index == originalNextEntryToRead)
		{
			platform_work_queue_entry entry = queue->entries[index];
			entry.callback(queue, entry.data);
			InterlockedIncrement((LONG volatile*)&queue->completionCount);
		}
	}
	else
		shouldSleep = true;

	return shouldSleep;
}

// Sometimes we want to execute all the task inside the queue, and
// to start filling it again after some event (such as hot code reloading)
void processAllWorkQueue(platform_work_queue* queue)
{
    while (queue->completionGoal != queue->completionCount)
    	processNextWorkQueueEntry(queue);

    queue->completionGoal = 0;
    queue->completionCount = 0;
}

Now, the queue can start working only after we prepared some task for it to crunch, and the work load is dictated of course by the necessities of the application. Each task is characterized by its data and callback, and these two elements together with the queue itself are going to be the arguments of the addWorkQueueEntry function:

void addWorkQueueEntry(platform_work_queue* queue, platform_work_queue_callback* callback, void* data)
{
	// Implement circular FIFO logic
	uint32 newNextEntryToWrite = ((queue->nextEntryToWrite + 1) % ArrayCount(queue->entries));

	// Make sure the cicular queue hasn't wrapped around, before writing
	Assert(newNextEntryToWrite != queue->nextEntryToRead);

	platform_work_queue_entry* entry = queue->entries + queue->nextEntryToWrite;
	entry->data = data;
	entry->callback = callback;
	++queue->completionGoal;

	// Protect from compiler aggressive code optimization
	_WriteBarrier();

	queue->nextEntryToWrite = newNextEntryToWrite;

	// Increase semaphore count by 1 and return previous one
	ReleaseSemaphore(queue->semaphoreHandle, 1, 0);
}

In this last function, we update the circular index of the work to be executed and we insert data and callback into the queue. Note how the _WriteBarrier() call is used in order to protect against aggressive compiler optimizations that may move the code up and down the boundary  without considering the multithreading context. Finally we increment the semaphore, forcing at least one thread to become interested in our task.

Wow, that was quite a ride but i think the multithreaded job queue was worth it. I am sure the system can still be greatly improved, but this is what i am currently toying with. I hope to be back soon with some update!

Reverse Depth Buffer in OpenGL

In computer graphics, when a 3D scene needs to be projected on a 2D surface (the screen) there is always the problem of handling the depth, which is the third dimension that’s going to be physically lost after the projection. In hand painting the problem is easily solved using the Painter’s Algorithm, which consists of drawing in a back-to-front fashion from the background to the objects on focus. The Painter’s Algorithm could be also used in computer graphics but it requires the objects to be sorted along the depth direction, which almost always is a very expensive operation. Sorting is needed in a first place because the objects in a scene are never sent to the renderer in a back-to-front ordering, but often they are looped and drawn together when they share some common data (textures, meshes, etc.) so that the cache usage is optimized. Depth buffering is a technique used in order to determine which elements in a scene are visible from the camera, paying the cost in terms of memory instead of processing power. For each pixel its relative depth value is saved into a buffer, and during a depth test this value is eventually overwritten if some new pixel entry  happens to be closer to the camera. Depth buffering works very well and it’s a widespread technique in the industry, but it’s often not trivial to reason about its actual precision. But what do we mean by depth buffer precision and why do we care? And if we do, how do we actually improve it? I’ll try to answer these questions along the rest of this post.


Understanding the Problem

First of all i have to admit i lied to you before, for the sake of readability, when i told you that  the z-buffer stores the depth values. In my defense i have to say that it’s more intuitive to think about it in this way, but in reality the z-buffer stores the inverse of the depth. After the perspective transform, in fact, linear operations on pixels such as interpolations are not valid anymore because the perspective is inherently non-linear. Turns out that it’s more efficient to project ahead the expression of the linear equation itself, instead of back-projecting the vertices, doing the interpolation and re-projecting forward again. When the inverse of the depth is used it’s possible to apply linear interpolation in the projected space, but from now on we are forced to deal with non-linear depths. This is when the precision becomes an issue, because the depths distribution is now characterized by uneven intervals from the near plane (n) to the far plane (f).  All the precision is focused on the first half of the range (f – n), and also the highest floating point precision is in this range, leaving the second half to starvation.  The effect of this behavior is that objects in the second half of the depth range suffer from z-fighting, meaning that their depth values may be considered equal even if the game logic placed them at slightly distant z values, resulting in a troublesome blinking effect. A very good analysis of the depth precision problem is this post from Nathan Reed (https://developer.nvidia.com/content/depth-precision-visualized), take your time to read it because it’s worth it if you are interested in this topic. The result of his tests show that the “reverse z-buffer” approach is a good solution to the problem, and i have found the same suggestion also in more than one modern textbook about graphics programming that i had the pleasure to read (Foundations of Game Engine Development 2 and Real Time Rendering 4th edition, in particular). This reverse z-buffer seems worth to tinker with, so let’s get our hands dirty!


Reverse z: Why and How

The main idea behind reverse z-buffering is to shift the range of high floating point precision towards the second half of the depth range, hopefully compensating for the loss of precision from the non linear z. The list of necessary steps to implement it in OpenGL is summarized in this other good read https://nlguillemot.wordpress.com/2016/12/07/reversed-z-in-opengl/. My implementation in the Venom Engine was inspired by all the material i discussed up to this point, and it consists of the following steps:

  •  use a floating point depth buffer. I specified GL_DEPTH_COMPONENT32F during the depth texture creation;

  • set the depth clip conventions to the range [0,1] by using glClipControl(GL_LOWER_LEFT, GL_ZERO_TO_ONE) . This is in line with other graphics API (Direct3D and Vulkan to begin with), and also seems to benefit the precision by distributing it over the entire range instead of focusing it around the middle point, like in the native OpenGL range [-1, 1];

  • write a projection matrix that transforms the near and far clip planes in the range [1, 0], respectively. This is actually the step that implements the reversion of the depth range;

  • set the depth test to glDepthFunc(GL_GEQUAL) since now the closest values to the camera have an increasing z value;

  • clear the depth buffer to 0 instead of the default 1, because of the inverted range;

Let’s see how to design the perspective transform:

 z_{clip} = \frac{A*z_{cam} + B*w_{cam}}{-z_{cam}} =  \frac{A*z_{cam} + B}{-z_{cam}} 

\begin{cases} 1 & = & (-A*n + B) / n \\ 0 & = & (-A*f + B) / f \end{cases} \hspace{25pt} \Rightarrow \hspace{25pt} \begin{cases} n & = & -A*n + B \\ B & = & A*f \end{cases}

\begin{cases} n & = & -A*n + A*f\\ B & = & A*f \end{cases} \hspace{26pt} \Rightarrow \hspace{25pt} \begin{cases} A & = & n / (f - n) \\ B & = & f*n / (f - n) \end{cases}

In particular, my implementation in C++ looks like this:

inline matrix4f_bijection perspectiveTransform(float aspectRatio, float focalLength, float n, float f)
{
	matrix4f_bijection result;
	
	float s = aspectRatio;
	float g = focalLength;
	float A = n / (f - n);
	float B = f*n / (f - n);

	result.forward = Matrix4f(g/s , 0.0f, 0.0f, 0.0f,
		                  0.0f,  g  , 0.0f, 0.0f,
		                  0.0f, 0.0f,  A  ,  B  ,
		                  0.0f, 0.0f,-1.0f, 0.0f);

	// Precomputed inverse transform
	result.inverse = Matrix4f(s/g , 0.0f, 0.0f, 0.0f,
		                  0.0f, 1.0f/g, 0.0f, 0.0f,
		                  0.0f, 0.0f, 0.0f, -1.0f,
		                  0.0f, 0.0f, 1.0f/B, A/B);
	
	// Use this to test the correct mapping of near plane to 1.0f, and the
	// far plane to 0.0f
	Vector4f test0 = result.forward*Vector4f(0.0f, 0.0f, -n, 1.0f);
	test0.xyz /= test0.w;
	Vector4f test1 = result.forward*Vector4f(0.0f, 0.0f, -f, 1.0f);
	test1.xyz /= test1.w;
	
	return result;
}

As you can see, i store forward and precomputed backward transformation in a struct.  Moreover, i use by convention a right-handed coordinate system with the negative z as gazing direction and the upward positive y direction. At the end of the function i inserted a check that verifies the correct transformation for near and far planes. Be sure to test your own implementation, and then you can freely comment out or remove these lines of code. A fine trick that i learned is that if you want to go back to the normal depth range, you can replace each value of n with f and viceversa inside the expression for the constants A and B. Of course you also need to revert the other changes (GL_GEQUAL to GL_LEQUAL, clear to 1, comment out glClipControl). By switching back and forth from normal to reversed z-range i definitely notice an increased z-precision, and for this reason i don’t think i will ever go back to the previous way of doing things.


Side Effects

While the benefits of the reversed z-buffer are convincing, they are not without side effects. The most annoying consequence is that, from the moment you adopt the reversed depth buffer in your codebase, you will always have to reason about depth in a reversed way. I chose a couple of code snippets that show the effect of this change of reasoning, and i am going to discuss them briefly to give you an example. They are both shaders, which makes more diffcult also their debugging without tools like NVIDIA Nsigth or RenderDoc. For the sake of brevity i am going to omit all the details behind their creation (compiling and linking, uniforms, etc.) and their actual purpose, because it’s only important to notice how the depth is considered in a reverse z-buffer situation.

// Fragment shader used for depth peeling. It applies order-independent transparency and 
// distance-based fog
void main(void)
{
	float fragZ = gl_FragCoord.z;

#if DEPTH_PEELING
	// From the second pass onward the DEPTH_PEELING macro is going to be active. 
	// Here we fetch the depth texture of the previous pass and discard all fragments 
	// that are at the same z depth or closer to the camera (higher value because of reverse z)
	float clipDepth = texelFetch(depthSampler, ivec2(gl_FragCoord.xy), 0).r;
	if (fragZ >= clipDepth)
		discard;
#endif
	
	vec4 texSample = texture(textureSampler, fragUV);
	
	// Compute fading quantities for fog and general transparency
	float tFog = clamp(((fogDistance - fogStart) / (fogEnd - fogStart)), 0, 1);
	float tAlpha = clamp(((fogDistance - clipAlphaStart) / (clipAlphaEnd - clipAlphaStart)), 0, 1);	

	// Apply transparency, and if the pixel has an alpha value greater than a threshold the fog
	// fading is also applied, otherwise it is discarded
	vec4 modColor = fragColor * texSample * tAlpha;
	if (modColor.a > alphaThreshold)
	{
		resultColor.rgb = mix(modColor.rgb, fogColor, tFog);
		resultColor.a = modColor.a;
	}
	else
		discard;
}

// Fragment shader for custom multisample resolve. Here we need to compute the minimum and
// maximum depth values for each sample of a fragment, finally computing the value in the middle.
// Notice how we initialize the minimum to the maximum distance (0.0f, the far clip plane) and
// viceversa for the maximum, and then we shrink the ranges by computing max and min respectively.
// This is highly counter-intuitive when a reversed depth buffer is applied, and it's also difficult
// to debug!
void main(void)
{
	float depthMin = 0.0f;
	float depthMax = 1.0f;

	for (int sampleIndex = 0; sampleIndex < sampleCount; ++sampleIndex)
	{
		float depth = texelFetch(depthSampler, ivec2(gl_FragCoord.xy), sampleIndex).r;
		depthMin = max(depth, depthMin);
		depthMax = min(depth, depthMax);
	}

	gl_FragDepth = 0.5f*(depthMin + depthMax);
	
	vec4 combinedColor = vec4(0, 0, 0, 0);
	for (int sampleIndex = 0; sampleIndex < sampleCount; ++sampleIndex)
    {
		float depth = texelFetch(depthSampler, ivec2(gl_FragCoord.xy), sampleIndex).r;
		vec4 color = texelFetch(colorSampler, ivec2(gl_FragCoord.xy), sampleIndex);

		combinedColor += color;
    }
	
	resultColor = combinedColor / float(sampleCount);
}

There are many other examples that i could bring up to discussion, but i wanted to keep the analysis fairily brief. Don’t let these examples scare you out of using a reverse depth buffer in your engine. In my experience, if every time you deal with depths and the z-direction you force yourself to remember about the reversed range, you are going to reason proactively about it and you will be the one in control. Otherwise, the reverse z-buffer won’t miss the chance to black-screen your application out of existence!

That’s all for now, enjoy the increased precision!

OpenGL modern context and extensions

Between all the difficult challenges in graphics programming, one of the most important requirement is to write scalable code capable of running in a wide spectrum of hardwares. When we talk about context in OpenGL we refer to the particular state of the API with respect to the specific hardware that runs it. I like how the OpenGL Wiki introduces this concept, using an oop comparison in which a context can be considered as an object instantiated from the “OpenGL class” (see https://www.khronos.org/opengl/wiki/OpenGL_Context). The most straightforward way to use OpenGL in your codebase is to delegate the context creation to an external library such as GLEW. But maybe if you feel ambitious, brave and crazy you might think to handle this cumbersome process all by yourself! On a more serious note, a common mindset between programmers is that building a feature from scratch, without relying on external tools even when they are “proven” to be effective, is equivalent to reinventing the wheel. The usual counter-argument to this statement is that the wheel has not been invented yet, at least in the filed of videogame programming, or that if the wheel actually exists then it is more similar to a squared one in reality. Whichever your position is in that regard, you might agree that having more control over your codebase, and limiting the influx of external dependencies at the same time is a desirable condition to achieve. Considering that the OpenGL context is a create-and-forget type of process, you are not paying this increased control with countless hours of development and maintenance. In this post i want to discuss my experience in creating a modern OpenGL context from scratch, describing also the process behind extension retrieval since it is closely related to the context itself. Hopefully this read is going to be helpful to some brave soul out there!


How to Create a Modern Context

So, here’s the deal with OpenGL contexts. Citing the Wiki: “Because OpenGL doesn’t exist until you create an OpenGL Context, OpenGL context creation is not governed by the OpenGL Specification. It is instead governed by platform-specific APIs.”. One consequence of this statement is that you need to code at least a very basic platform layer beforehand. In particular, the bare minimum feature that you need to implement is the creation of a window, so nothing too difficult to begin with. In my case i chose Windows and the Win32 API, and therefore i will be able to describe the context creation only relatively to this platform. As a first step i included <gl/GL.h> between the header files, getting access to all the needed OpenGL types, macros and functions. Then, my engine creates the application window specifying the CS_OWNDC macro along with the other desired styles. Remember that this is a mandatory step! Each window has an associated Device Context (DC) that in turn can store a Pixel Format, a structure describing the desired properties of the default framebuffer. By calling the Win32 function ChoosePixelFormat, Windows is going to select the closest match between the specified pixel format and a list of supported formats. Finally, the context can be created using SetPixelFormat and activated with wglMakeCurrent. Now, the pixel format can be filled in the old-fashioned way (using the values suggested in the OpenGL wiki), but this process is not capable of creating a “modern” OpenGL context. For modern context we intend an OpenGL configuration that allows to import relatively recent features that are considered to be very useful in modern graphics programming, such as sRGB textures and framebuffers, Multisampling, and many other. In order to create this modern context we need to call a function that is not natively present in core OpenGL, and this is where the concept of extensions starts to be relevant. Extensions are query-based functions that expand the core functionalities of OpenGL, and every program that wants to use them needs to check their availability in the specific graphic card, and eventually to import them. The Windows specific extensions are called WGL extensions, and in order to create a modern contex we need to call one of them: wglChoosePixelFormatARB. So, we can fill the pixel format in the old way in order to create a legacy context, or we can retrieve the WGL variant and fill the pixel format using a list of desired attributes instead, specified as OpenGL macros. If we decide to create a modern context (as we should), however, there is a last inconvenient to overcome. In order to retrieve wglChoosePixelFormat we need to have an active OpenGL context, hence we are forced to start with a dummy legacy context. Since Windows doesn’t allow to change the pixel format after it has been set in a first place, we need to create the modern context from scratch and to delete the dummy one. The following code snippet implements the logics we just described:

void setOpenGLDesiredPixelFormat(HDC windowDC)
{
	int suggestedPixelFormatIndex = 0;
	GLuint extendedPick = 0;

	if (wglChoosePixelFormatARB)
	{
		int intAttribList[] =
		{
			WGL_DRAW_TO_WINDOW_ARB, GL_TRUE,
			WGL_ACCELERATION_ARB, WGL_FULL_ACCELERATION_ARB,
			WGL_SUPPORT_OPENGL_ARB, GL_TRUE,
			WGL_DOUBLE_BUFFER_ARB, GL_TRUE,
			WGL_PIXEL_TYPE_ARB, WGL_TYPE_RGBA_ARB,
			WGL_FRAMEBUFFER_SRGB_CAPABLE_ARB, GL_TRUE,
			0,
		};

		if (!GLOBAL_OpenGL_State.supportsSRGBframebuffers)
			intAttribList[10] = 0;

		wglChoosePixelFormatARB(windowDC, intAttribList, 0, 1, &suggestedPixelFormatIndex, &extendedPick);
	}

	if (!extendedPick)
	{
		PIXELFORMATDESCRIPTOR desiredPixelFormat = {};
		desiredPixelFormat.nSize = sizeof(desiredPixelFormat);
		desiredPixelFormat.nVersion = 1;
		desiredPixelFormat.dwFlags = PFD_SUPPORT_OPENGL | PFD_DRAW_TO_WINDOW | PFD_DOUBLEBUFFER;
		desiredPixelFormat.cColorBits = 32;
		desiredPixelFormat.cAlphaBits = 8;
		desiredPixelFormat.cDepthBits = 24;
		desiredPixelFormat.iLayerType = PFD_MAIN_PLANE;
		desiredPixelFormat.iPixelType = PFD_TYPE_RGBA;

		// We suggest a desired pixel format, and windows searches for a fitting one
		suggestedPixelFormatIndex = ChoosePixelFormat(windowDC, &desiredPixelFormat);
	}

	PIXELFORMATDESCRIPTOR suggestedPixelFormat;
	DescribePixelFormat(windowDC, suggestedPixelFormatIndex, sizeof(suggestedPixelFormat), &suggestedPixelFormat);
	SetPixelFormat(windowDC, suggestedPixelFormatIndex, &suggestedPixelFormat);
}

void loadWGLExtensions()
{
	// Create a dummy opengl context (window, DC and pixel format) in order to query the wgl extensions,
	// it is going to be deleted at the end of the function
	WNDCLASSA windowClass = {};
	windowClass.lpfnWndProc = DefWindowProcA;
	windowClass.hInstance = GetModuleHandle(0);
	windowClass.lpszClassName = "Venom Engine wgl loader";

	if (RegisterClassA(&windowClass))
	{
		HWND window = CreateWindowExA(0, windowClass.lpszClassName, "Venom Engine Window", 0, CW_USEDEFAULT,
			                      CW_USEDEFAULT, CW_USEDEFAULT, CW_USEDEFAULT, 0, 0, windowClass.hInstance, 0);

		HDC windowDC = GetDC(window);
		setOpenGLDesiredPixelFormat(windowDC);
		HGLRC openGLRC = wglCreateContext(windowDC);

		if (wglMakeCurrent(windowDC, openGLRC))
		{
			// Since we are here, we might as well retrieve other useful WGL extensions.
			// The definition of the following macro is going to be discussed later
			Win32wglGetProcAddress(wglChoosePixelFormatARB);
			Win32wglGetProcAddress(wglCreateContextAttribsARB);
			Win32wglGetProcAddress(wglSwapIntervalEXT);
			Win32wglGetProcAddress(wglGetExtensionsStringEXT);

			if (wglGetExtensionsStringEXT)
			{
				// Parse extensions string
				char* extensions = (char*)wglGetExtensionsStringEXT();
				char* at = extensions;
				while (*at)
				{
					while (IsWhiteSpace(*at))
						++at;

					char* end = at;
					while (*end && !IsWhiteSpace(*end))
						++end;

					uintptr count = end - at;
					if (AreStringsEqual(count, at, "WGL_EXT_framebuffer_sRGB"))
						GLOBAL_OpenGL_State.supportsSRGBframebuffers = true;
					else if (AreStringsEqual(count, at, "WGL_ARB_framebuffer_sRGB"))
						GLOBAL_OpenGL_State.supportsSRGBframebuffers = true;

					at = end;
				}
			}

			wglMakeCurrent(0, 0);
		}

		wglDeleteContext(openGLRC);
		ReleaseDC(window, windowDC);
		DestroyWindow(window);
	}
}

Note how we save into a global state some information that derives from parsing the extensions string. It doesn’t have to be necessarily a global structure, you can choose to make it local and to pass it into the function, maybe also returning the same struct in order to share the information externally.


Extensions Retrieval

Since a modern game engine requires to have a great number of extensions, it can be useful to semi-automate their retrieval with the definition of some macro. Firstly, the needed extensions can be literally copy-pasted from https://www.khronos.org/registry/OpenGL/api/GL/glcorearb.h and from https://www.khronos.org/registry/OpenGL/api/GL/glext.h. A custom prefix can then be added before each function name in order to create their type (i use “vm_” in my engine), creating the function pointers in the following way:

// Macro that creates a function pointer for an extension.  
#define DefineOpenGLGlobalFunction(name) static vm_##name* name;

// Usage example: copy-paste the function from glcorearb.h, add any prefix and define the function pointer
// with the macro
typedef void WINAPIvm_glDebugMessageCallbackARB(GLDEBUGPROC* callback, const void *userParam);
DefineOpenGLGlobalFunction(glDebugMessageCallbackARB);

The extensions can be finally retrieved using wglGetProcAddress inside the following macro, remembering that the name is case sensitive. The initOpenGL function summarizes the entire process, from context creation to extension retrieval:

#define Win32wglGetProcAddress(name) name = (vm_##name*)wglGetProcAddress(#name);

// Example of desired attributes for the pixel format of a modern context
int win32OpenGLAttribs[] =
{
	WGL_CONTEXT_MAJOR_VERSION_ARB, 3,
	WGL_CONTEXT_MINOR_VERSION_ARB, 3,
	WGL_CONTEXT_FLAGS_ARB, WGL_CONTEXT_FORWARD_COMPATIBLE_BIT_ARB
#if DEBUG_MODE
	| WGL_CONTEXT_DEBUG_BIT_ARB
#endif
	,
	WGL_CONTEXT_PROFILE_MASK_ARB, WGL_CONTEXT_CORE_PROFILE_BIT_ARB,
	0,
};

void initOpenGL(HDC windowDC)
{
	loadWGLExtensions();
	setOpenGLDesiredPixelFormat(windowDC);

	bool8 modernContext = true;
	HGLRC openGLRC = 0;
	if (wglCreateContextAttribsARB)
		openGLRC = wglCreateContextAttribsARB(windowDC, 0, win32OpenGLAttribs);

	if (!openGLRC)
	{
		modernContext = false;
		openGLRC = wglCreateContext(windowDC);
	}

	if (wglMakeCurrent(windowDC, openGLRC))
	{
		// Extract all the desired extensions
		Win32wglGetProcAddress(glDebugMessageCallbackARB);
		...
	}
}

Be prepared to fill this section of the code with countless extensions!


Scalability

We are now able to initialize a modern OpenGL context but the engine might still run in a very old machine, and therefore it’s important to check every time some additional clue about the specific hardware. We could define a function that fills a struct with relevant informations about the state of the specific GPU. In particular, this function may check information about vendor, renderer, version, shading language version (eventually none, and the renderer falls back to the fixed pipeline) and then it can parse the extensions string. Here, the most important extensions usually are GL_EXT_texture_sRGB, GL_EXT_framebuffer_sRGB, GL_ARB_framebuffer_sRGB and GL_ARB_framebuffer_object, and for each one we can set a boolean in the return struct indicating if they are supported or not. In the next code snippet, wherever you see a string-related function that was not previously defined, feel free to use your favourite string library or your personal implementation. I have just inserted the syntax from the string library of my engine as a placeholder, but it should be straightforward to understand what each function does:

struct opengl_info
{
	char* vendor;
	char* renderer;
	char* version;
	char* shadingLanguageVersion;

	bool32 GL_EXT_texture_sRGB;
	bool32 GL_EXT_framebuffer_sRGB;
	bool32 GL_ARB_framebuffer_sRGB;
	bool32 GL_ARB_framebuffer_object;
	bool32 modernContext;
};

void parseExtensionsString(opengl_info* info)
{
	if (glGetStringi)
	{
		GLint extensionCount = 0;
		glGetIntegerv(GL_NUM_EXTENSIONS, &extensionCount);

		for (GLint extensionIndex = 0; extensionIndex < extensionCount; ++extensionIndex)
		{
			char* extensionName = (char*)glGetStringi(GL_EXTENSIONS, extensionIndex);
			
			if (AreStringsEqual(extensionName, "GL_EXT_texture_sRGB"))
				info->GL_EXT_texture_sRGB = true;
			else if (AreStringsEqual(extensionName, "GL_EXT_framebuffer_sRGB"))
				info->GL_EXT_framebuffer_sRGB = true;
			else if (AreStringsEqual(extensionName, "GL_ARB_framebuffer_sRGB"))
				info->GL_ARB_framebuffer_sRGB = true;
			else if (AreStringsEqual(extensionName, "GL_ARB_framebuffer_object"))
				info->GL_ARB_framebuffer_object = true;
		}
	}
}

opengl_info getInfo(bool8 modernContext)
{
	opengl_info result = {};
	result.vendor = (char*)glGetString(GL_VENDOR);
	result.renderer = (char*)glGetString(GL_RENDERER);
	result.version = (char*)glGetString(GL_VERSION);
	result.modernContext = modernContext;

	if (result.modernContext)
		result.shadingLanguageVersion = (char*)glGetString(GL_SHADING_LANGUAGE_VERSION);
	else
		result.shadingLanguageVersion = "(none)";

	parseExtensionsString(&result);
	checkSRGBTexturesSupport(&result);

	return result;
}

A usage example for this opengl_info struct is shown for the sRGB texture support in the next code snippet:

void checkSRGBTexturesSupport(opengl_info* info)
{
	char* majorAt = info->version;
	char* minorAt = 0;
	for (char* at = info->version; *at; ++at)
	{
		if (at[0] == '.')
		{
			minorAt = at + 1;
			break;
		}
	}

	int32 majorVersion = 1;
	int32 minorVersion = 0;
	if (minorAt)
	{
		majorVersion = StringToInt32(majorAt);
		minorVersion = StringToInt32(minorAt);
	}

	if ((majorVersion > 2) || ((majorVersion == 2) && (minorVersion >= 1)))
		info->GL_EXT_texture_sRGB = true;
}

This is just a first step in satisfying your scalability requirements, but the main concept will always be similar to what we have seen: query the machine about its hardware/software details, and write code that can handle the greatest number of usage cases. Sometimes it won’t be possible to satisfy every side, and that’s where you’ll have to make some choice. Of course it’s not wise to support very old hardwares and/or operating systems if you have to penalize some modern feature, but it’s rare to find easier decisions than this. Most of the time your approach is going to be dictated by complex strategies and situations, and you will have to work out the best solution capable of satisfying technology, management and marketing aspects.

That’s all i wanted to say about this topic for now. The next step after setting the modern context and a bunch of extensions is to actually start using OpenGL, so go on and draw that dreaded first triangle!

Hot Code Reloading

The videogame development industry relies heavily on fast programming languages such as C/C++, for obvious reasons, but most of the time also some scripting language can be used on top of the core layers of the engine. Languages like Python, C# or Lua allow for an easy and modular production of gameplay code, which is often based on the fine tuning of several parameters (especially at the final stages of development). Without a scripting language it would be necessary to recompile and relink the code for each tiny modification of any parameter, and this of course lowers the productivity of the entire team. A piece of code written with a scripting language can be modified and reloaded at runtime, a technique usually known as hot code reloading. However, the integration of several different programming languages increases the overall complexity of the engine, and requires to write one or more very robust parsers that are capable of translating the information from one language to the other. The aim of this post is to describe a technique for hot code reloading that doesn’t require to use a scripting language, but can be directly implemented in C/C++ with a slight modification of the engine architecture. Yes, you heard me well, it’s actually possible to leave the executable running and to modify any piece of code at runtime, immediately seeing the results and eventually keep tuning the transparency of that pesky particle system. The first time i even heard of this method was during an episode of Handmade Hero, the awesome streaming about game engine coding from Casey Muratori. I’ll simply describe my own implementation and my experience in using this feature, possibly also demystifying that black magic feeling behind it!


Requirements

The first key component for the implementation of hot code reloading is the separation between platform code and game code. This feature is already a good idea without hot reloading in mind, because it makes easier to port the game to a different platform (even on console) since the code that interacts with the operating system is decoupled from the actual game. Platform and game can interact in the same way a scripting language interacts with the engine, provided that the platform code is built as an executable and the game is built as a dll. The platform code keeps the entire application running, while we can modify the game dll at will and reloading it each time a new recompilation process is sensed by the platform itself. In particular, since the game is going to be imported just like a library, we need to identify and group its main functions in order to export them as extern function pointers. For example we might choose to develop game logic and rendering as one library, audio processing as another and finally also a library for eventual debug services. Of course each of these function pointers can contain calls to many other functions, just like a main function contains the entire codebase in itself, even if technically the main function of a dll is a little bit different thing and it is optional. I have used three general arguments for our function pointers (memory, inputs and render commands) that need to be provided by the platform code, but of course the entire system can be expanded if needed. It’s important to remember that the following code has to be defined in a header file which is visible from both platform and dll code:

// At first we introduce a macro that simply defines a function, and then we define a C-style function pointer. 
// This allows to eventually introduce a "stub" version of itself, for example in order to handle cases of failed initialization
#define GAME_UPDATE_AND_RENDER(name) void name(game_memory* memory, game_input* input, game_render_commands* renderCommands)
typedef GAME_UPDATE_AND_RENDER(game_update_and_render);

#define GAME_GET_SOUND_SAMPLES(name) void name(game_memory* memory, game_sound_output_buffer* soundBuffer)
typedef GAME_GET_SOUND_SAMPLES(game_get_sound_samples);

#define DEBUG_GAME_END_FRAME(name) void name(game_memory* memory, game_input* input, game_render_commands* renderCommands)
typedef DEBUG_GAME_END_FRAME(debug_game_end_frame);

// We specify that this function is going to be exported. Extern "C" is for name mangling
extern "C" __declspec(dllexport) GAME_UPDATE_AND_RENDER(gameUpdateAndRender)
{
	// Implement the game
	...
}

// Repeat also for audio and debug services
...

The second key component to a successful hot code reloading is to handle correctly the memory. If we ask for memory in the game code, in fact, after the reloading process all pointers are not going to be valid anymore. This is another good reason to keep platform and game as separated chunks! The platform code, being the one responsible for the comunication with the OS, acts as the gatekeeper for memory and it is the one that holds the pointers. In this way, even when the game is reloaded the pointers to memory are still going to be valid because the platform code is always running. The game of course has the right to ask for more memory, but the request has to pass through the platform layer every time. Many game engines that i know already apply this strategy for memory management (which is a big allocation at startup followed by eventual expansions when needed), but if your engine absolutely needs to call new or malloc every time also in the dll then maybe hot code reloading can be a tough feature to introduce in your codebase. For this reason, it would be ideal to plan for hot code reloading during the early stages of development.


Implementation

Using Windows and the Win32 API, the actual code reloading can be achieved by retrieving the function pointers with GetProcAddress and assigning them to pointers of the platform layer. This of course needs to be done once before the main game loop, and can be repeated each time the current dll write time is different than the last one. As you can see in the next code snippet, every time we load the game code we also save the current write time in the win32_game_code struct:

struct win32_game_code
{
	HMODULE gameCodeDLL;
	FILETIME lastDLLwriteTime;
	
	game_update_and_render* updateAndRender;
	game_get_sound_samples* getSoundSamples;
	debug_game_end_frame* DEBUG_EndFrame;

	bool32 isValid;
}

inline FILETIME getLastWriteTime(char* fileName)
{
	FILETIME lastWriteTime = {};
	WIN32_FILE_ATTRIBUTE_DATA data;
	if (GetFileAttributesEx(fileName, GetFileExInfoStandard, &data))
		lastWriteTime = data.ftLastWriteTime;

	return lastWriteTime;
}

win32_game_code loadGameCode(char* sourceDLLname, char* tempDLLname, char* lockFileName)
{
	win32_game_code result = {};

	WIN32_FILE_ATTRIBUTE_DATA ignored;
	if (!GetFileAttributesEx(lockFileName, GetFileExInfoStandard, &ignored))
	{
		result.lastDLLwriteTime = getLastWriteTime(sourceDLLname);

		CopyFile(sourceDLLname, tempDLLname, FALSE);
		result.gameCodeDLL = LoadLibraryA(tempDLLname);
		if (result.gameCodeDLL)
		{
			result.updateAndRender = (game_update_and_render*)GetProcAddress(result.gameCodeDLL, "gameUpdateAndRender");
			result.getSoundSamples = (game_get_sound_samples*)GetProcAddress(result.gameCodeDLL, "gameGetSoundSamples");
			result.DEBUG_EndFrame = (debug_game_end_frame*)GetProcAddress(result.gameCodeDLL, "DEBUGGameEndFrame");
			result.isValid = (result.updateAndRender && result.getSoundSamples && result.DEBUG_EndFrame);
		}
	}

	if (!result.isValid)
	{
		result.updateAndRender = 0;
		result.getSoundSamples = 0;
		result.DEBUG_EndFrame = 0;
	}

	return result;
}

void unloadGameCode(win32_game_code* gameCode)
{
	if (gameCode->gameCodeDLL)
	{
		FreeLibrary(gameCode->gameCodeDLL);
		gameCode->gameCodeDLL = 0;
	}

	gameCode->isValid = false;
	gameCode->updateAndRender = 0;
	gameCode->getSoundSamples = 0;
}

The arguments of the loadGameCode function are three strings: source, temp and lock names. The first two are the paths to the locations of game dll and a temporary file that holds its copy, and they can be hardcoded or can be determined at runtime using a combination of Win32 functions (such as GetModuleFileNameA) and string manipulation. The last one, the lock, has to do with Visual Studio locking the .pdb file even after the dll is unloaded. One way to overcome this issue is to force Visual Studio to generate a pdb with a different name every time the code is recompiled, for example using the following expression:

// Right click the DLL project and select Properties->Configuration Properties->Linker->Debugging->Generate Program Database File
$(OutDir)$(TargetName)-$([System.DateTime]::Now.ToString("TMA_mm_ss_fff")).pdb

However, now the pdb files are going to pile up in the output folder after every recompilation. We can define a pre-build event for the dll in which we delete all .pdb files: 

// Right click the DLL project and select Properties->Configuration Properties->Build Events->Pre-Build Event
del "$(Outdir)*.pdb" > NUL 2> NUL

The final issue we have with the .pdb file is that the MSVC compiler actually writes the dll file before it, and therefore during code hotloading the dll is going to be loaded immediately while the .pdb still has to be written. At this point Visual Studio would fail to load the .pdb, and debugging the code after reloading would be impossible. This is why we create the lock file passed as argument in loadGameCode! This lock is just a dummy file that is created in a pre-build event and deleted in a post-build event:

// During pre-build event
del "$(Outdir)*.pdb" > NUL 2> NUL 
echo WAITING FOR PDB > "$(Outdir)lock.tmp"

// During post-build event
del "$(Outdir)lock.tmp"

During its lifetime, the lock file is a living proof that the code is still being loaded. For this reason, in the loadGameCode function we check if the lock file is not present by calling if (!GetFileAttributesEx(…)) and only under this circumstance we proceed to load the dll. This ensures that also the .pdb file has been written and allows to debug the code as usual.

Finally, let’s see how to actually trigger the hotloading after each recompilation:

// Before game loop (platform layer)
win32_game_code game = loadGameCode(sourceGameCodeDLLpath, tempGameCodeDLLpath, gameCodeLockpath);

...

// Inside the game loop (platform layer), between the update and the render
FILETIME newDLLwriteTime = getLastWriteTime(sourceGameCodeDLLFullPath); 					
bool32 isExeReloaded = false;

// Check if the name of the DLL has changed. Since we create a unique DLL name each time, this event
// indicates that a code reloading needs to happen
bool32 doesExeNeedReloading = (CompareFileTime(&newDLLwriteTime, &game.lastDLLwriteTime) != 0);
if (doesExeNeedReloading)
{
	// If the code is multithreaded and a work queue is implemented, complete all
	// the task now because the callbacks may point to invalid memory after the reloading
	...
	
	// If the debug system is designed to record events along the codebase, now it's the
	// time to stop it
	...

	unloadGameCode(&game);
	game = loadGameCode(sourceGameCodeDLLpath, tempGameCodeDLLpath, gameCodeLockpath);
	isExeReloaded = true;
}

That’s it! A current limit of this hot code reloading implementation is the lack of robustness towards changes of the data layout inside classes and/or structs. If variables are added, removed or reordered inside a class the static memory is going to fail because it would read/write from wrong locations. While it’s possible to solve this issue by improving both memory management and the reloading code, possibly with some mild refactoring, i believe that a feature like this should be dictated by real necessities from the gameplay programming side. If changing data layout at runtime were effectively a time-saving feature for some specific type of debugging or tuning, then i would be interested in investing more time to improve the system. Otherwise, i would just consider this as premature optimization, and you already know what more experienced programmers than me have to say about that! 


Demo

In this example i launch the executable outside the debugger. I am interested in tuning the movement speed of an animation, and thanks to hot code reloading i can change the source code and immediately see the effect on my application:


That’s all for now, happy code reloading!